MAIN FEATURES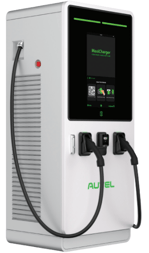
-
Level 3 - DC Fast Charger
-
Max Current: Up to 240 kW
-
Output: Available Single or Dual with CCS1, CCS1 Boost or CHAdeMO,
-
Operating temperature: -31 °F to +131 °F (+122 °F to +131 °F with Linear Power Derating)
START CHARGING
For all models, once all electrical connections have been safely made, switch on the power to the circuit from the circuit breaker and wait for the power supply to come on. There will be a series of self-check starts, making sure that the charger works correctly and safely.
The MaxiCharger enters communication with the EV following a successful authorization. When the Authorization Screen appears, you can use any of the following methods to start a charging session:
· Scan the QR code on the screen
· RFID card
· Plug & charge (supports the ISO 15118 PnC function)
· Credit card (optional)
The charge session will start automatically after passing safety tests.
- Park an EV with the charging port within reach of the connector.
- Plug in the vehicle.
- Start the charging session and authorization enabled.
- Stop the charging session.
![]() Ensure your EV is charging.
Ensure your EV is charging.
After a connector is successfully connected to your EV, the MaxiCharger can automatically recognize the connector and the corresponding connector’s Authorization screen will appear. If no operation is performed for a period of time on the Authorization screen, the Standby screen will appear. Manually select the connector on the touchscreen to exit the standby screen.
![]() DO NOT operate the MaxiCharger if the screen displays an error message.
DO NOT operate the MaxiCharger if the screen displays an error message.
Information about the charging duration, volume, cost, and power will appear on the Charging screen. Tap the Right Arrow button on the right to view more information about the charging status, including SoC (State of Charge), current, and voltage.

The power LED should illuminate green. If a recoverable error is detected, the charging LED illuminates orange; if the error cannot be recovered, it illuminates red.
STOP CHARGING
- Unplug the vehicle or tap the Stop button on the touchscreen.
- If a session stops unexpectedly, the charger requires another authorization to restart a charge session. Use the same authentication method to begin the charge again:
· QR Code/Credit Card: Tap the Stop button on the Charging Screen of the Autel Charge app.
· RFID Card: Tap the RFID card on the card reader again to finish charging. - Finish Charging. Return the connector to the holster on the MaxiCharger.
![]() The charging session stops automatically when the battery is full.
The charging session stops automatically when the battery is full.
![]() WARNING:
WARNING:
· Do not cover the vent during charging.
· Do not clean or operate in your EV during charging.
COMMON PROBLEMS AND TROUBLESHOOTING
- Connector Connection Error. If the connector is not connected to the EV, then the Connector Not Connected screen will appear. Disconnect completely, then plug in the EV and recheck the screen to see if the error message is resolved.
- Authorization Failure. The Authorization Failure screen appears when there is an error processing the chosen authentication method. The cause and possible solution(s) will display on the screen. Follow the on-screen instructions to resolve the problem, or contact to 7Gen Customer Support.
- Charge Start Failure. The Charge Start Failure screen appears when the charger has failed to pass the initialization process. The cause and possible solution(s) will display on the screen. Follow the on-screen instructions to resolve the problem.
- Charging Failure. The Charging Failure screen appears when various errors occur during a charge session. The cause and possible solution(s) will be displayed on the screen. Follow the on-screen instructions to resolve the problem, or contact to 7Gen Customer Support.
- Removing Condensation. There may be condensation in the charger if the charger is powered off for more than four hours. To remove it from the cabinet:
1. Open the front door
2. Set the main breakers to OFF position
3. Energize the MaxiCharger
4. Close the door. Wait two hours. The internal heater of the cabinet will heat the inside of the cabinet, and the condensation will evaporate
5. Open the front door
6. Set the main breakers to ON position
7. Close the door
DO YOU HAVE AN ISSUE THAT REQUIRES FURTHER ASSISTANCE?
Please, do not hesitate to contact us trough:
- 7Gen Customer Support Portal. By clicking here you can find instructions on how to create an account within our support center.
- Email: support@7gen.com
- Call: +1 855 743 6938 (+1-855-7GENZEV)
SMART CONNECTIVITY AND REMOTE MANAGEMENT
The Autel MaxiCharger DC fast charger supports multiple connectivity options, including Wi-Fi, Bluetooth, Ethernet, and 4G LTE, giving operators flexible choices for network integration depending on site infrastructure. An internet connection enables the full suite of cloud-based smart features, including remote session monitoring, real-time energy consumption data, and fault detection alerts.
The Autel Charge app provides smart app control from any mobile device, allowing operators to view charging status, manage RFID access lists, create user accounts, and schedule charging windows to reduce energy costs during peak hours. Firmware updates are delivered automatically over-the-air through the Autel Charge Cloud, ensuring the charger is always running the latest software without requiring on-site service visits. For sites without a hardwired Ethernet cable connection, Wi-Fi and 4G cellular connectivity are both supported natively. Wi-Fi setup and cellular configuration are guided through the Autel Charge Cloud, reducing cabling requirements and keeping installation straightforward for multi-charger commercial deployments.
The system integrates with OCPP (Open Charge Point Protocol), making it compatible with third-party charging management platforms. Security for charging sessions is maintained through RFID access control, QR code scanning, and ISO 15118 Plug & Charge verification, ensuring only authorized users and vehicles can initiate a session.
DYNAMIC LOAD BALANCING AND ENERGY MANAGEMENT
The Autel MaxiCharger DC Fast incorporates Dynamic Load Balancing, a cutting edge technology that distributes power across connected chargers in real time to prevent over-current events and keep energy consumption within the capacity of the local electrical supply. When multiple electric vehicles are charging simultaneously, Dynamic Load Balancing adjusts each unit's output automatically, ensuring rapid and efficient charging for all connected vehicles without overloading the grid.
For businesses and commercial fleet operators, this significantly reduces infrastructure costs by enabling more charging stations to be installed on an existing electrical supply without requiring costly service upgrades. The modular architecture of the MaxiCharger DC Fast also allows power to scale in 20 kW increments from 60 kW up to 240 kW as demand grows, making it a practical long-term solution for sites ranging from fleet depots to large commercial parking facilities. Once installed, the charger manages power allocation automatically, so operators can focus on running their fleet or service rather than managing electrical load manually.
CHARGING PERFORMANCE AND USE CASES
The Autel MaxiCharger DC Fast delivers impressive power outputs of up to 240 kW, with 96% efficiency at full power and a NEMA 3R enclosure rating for build quality and reliable outdoor performance in variable weather conditions. At maximum output, the charger can replenish up to 125 miles of range in approximately 10 minutes, making it well suited for highway corridors, fleet depots, and commercial parking facilities where faster charging and quick vehicle turnover are essential for EV owners and fleet customers alike.
The MaxiCharger supports CCS1, CCS1 Boost, and CHAdeMO connectors, providing compatibility with virtually any electric car or EV on the road. The Plug & Charge capability (ISO 15118) allows automatic vehicle verification and payment processing without requiring the driver to tap the app, scan a QR code, or present an RFID card, reducing the time spent at each charging station and ensuring rapid throughput during busy periods. EV owners can confirm the charger is working perfectly by checking the green LED status light on the unit.
AUTEL ENERGY PRODUCT FAMILY AND TECHNICAL SPECIFICATIONS
The Autel MaxiCharger DC Fast is part of the Autel Energy range of electric vehicle charging solutions for commercial, fleet, and public charging environments. For sites where DC fast charging is not required, the Autel MaxiCharger AC Wallbox is a compact Level 2 alternative delivering up to 9.6 kW (40A) for plug-in models or 12 kW (50A) for hardwired installations, with a NEMA 4 enclosure rating and support for Wi-Fi, Bluetooth, and Ethernet connectivity. The charging cable on the DC Fast Charger is tethered to the unit; cable length and installation requirements vary between the AC and DC product lines. The Autel MaxiCharger AC Wallbox user guide is available on the 7Gen support site for setup and operational guidance on that model.
For complete technical specifications, wiring diagrams, and installation documentation for the MaxiCharger DC Fast, refer to the manufacturer's manual provided with the unit or contact your 7Gen account representative.