CHARGING APP
Touch the Charging icon on the infotainment screen to open the Charging app. Select the desired tab to adjust the charging functions and settings.
- NEXT CHARGE OPTION. Select Charge Now to begin charging immediately upon plug-in, or Charge Later for delayed charging. Options include setting the target charge level, time selector, and cabin preconditioning.
- SCHEDULE OPTION. Provides options for setting a charge level and a schedule for when to charge each day of the week. With a schedule set, charging can occur during off-peak times at a lower cost. Cabin preconditioning also can be set to heat or cool the cabin using minimal
battery power. On days a schedule is not set, the vehicle will charge immediately upon plug-in.
- CHARGING SETTINGS. Enables custom settings for several features, including:
 Home Charge Location. Set charging times for your Home Charge Location, allowing charging at a lower cost during your electrical provider’s off-peak period.
- Notifications. Select on/off preferences for multiple notifications triggered during a charging session.
- Fast Charge Prep. Adjust the vehicle’s battery to the proper temperature for quicker DC Fast Charging. Start battery conditioning up to an hour before reaching the DC Fast Charging station. Battery conditioning uses battery energy, which may reduce driving range.
- Preconditioning Temperature. Set the desired temperature for the cabin before you start your drive.
- TARGET CHARGE LEVEL. The target charge level sets the maximum level the battery will charge to when plugged in. It will be set to 80% when the vehicle is new. It’s important to charge the battery to 80% for daily use to help promote battery health and optimal regenerative braking performance, which helps increase efficiency. For longer trips, adjust charging to above 80% for extended range. Change the setting back to 80% when additional charging is no longer needed.
Refer to the BrightDrop Zevo Quick Guide by clicking here
Refer to the whole BrightDrop Zevo Owner's Manual by clicking here
Refer to BrightDrop Zevo 600 Vehicle Operator Training Guide by clicking here
START CHARGING
· REGULAR (LEVEL 2 CHARGING):
- With the vehicle in Park, select the Charging icon to review the selected charge mode and charge cord limit. The 8-amp charge cord limit should be used until a qualified electrician inspects your facility’s electrical circuit capacity, or if the electrical circuit or outlet capacity is not known.
Note: If a Home Charge Location is not set, the charge level selection returns to the 8-amp setting each time the vehicle is driven. - Plug the charge cord into an electrical outlet. DO NOT PLUG INTO AN EXTENSION CORD.
- Press and release the rear edge of the charge port door, located just behind the driver-side rear wheelhouse, to open it.
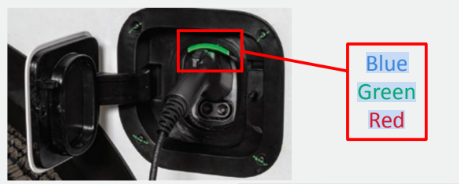
- Plug the charge cord into the charge port. The charge port indicator will illuminate "BLUE", and the vehicle will chirp once when connected.
- When charging begins, the charge port indicator will flash "GREEN", and the vehicle will chirp twice. If the charge port indicator flashes "RED", check the charge cord connection and power supply.
- Periodically check the electrical outlet/plug while charging. Discontinue use if the electrical outlet/plug is hot and have the outlet serviced by a qualified electrician.
Note: To temporarily override a delayed charge event, remove and reconnect the charge cord to the vehicle within 5 seconds. It will begin charging immediately.
· FAST (LEVEL 3 CHARGING):
- With the vehicle in Park, press and release the rear edge of the charge port door, located just behind the driver-side rear wheelhouse, to open it.

- Remove the DC dust port cover to allow DC Fast charger cord to connect to vehicle.
- Plug the DC charge cord into the vehicle’s charge port.
- The DC plug will be locked and cannot be disconnected while charging is active.
- When charging begins, the charge port indicator will flash "GREEN", and the vehicle will chirp twice.
END CHARGING
· REGULAR (LEVEL 2 CHARGING):
- When the charge port indicator is solid "GREEN", charging is complete.
- Unlock the charge cord from the vehicle by pressing the top latch button, and unplug the charge cord.
- Close the charge port door
- Unplug the charge cord from the electrical outlet.
· FAST (LEVEL 3 CHARGING):
- When the vehicle is fully charged, it will stop charging and the DC plug will be unlocked. To stop charging at any time, use the controls on the charging station or touch the Stop button on the Charging screen on the vehicle’s infotainment screen.
- When the charging Indicator is solid green or off, unplug the DC charge cord from the vehicle.
- Close the charge port door.
Understanding Charging Levels and Speeds
The BrightDrop Zevo supports three levels of EV charging, each with a different power output, charging speed, and use case. Understanding these options helps drivers and fleet managers plan charging schedules and maintain vehicle availability.
Level 1 (120V AC): Uses a standard 120V household outlet. Provides approximately 3 to 4 miles of driving range per hour. A full charge can take 30 to 35 hours, making Level 1 generally unsuitable for regular commercial use with delivery vans.
Level 2 (240V AC): The most practical and common solution for BrightDrop vans operating in commercial fleets. A 240V AC charger with the standard 11.5 kW onboard charger delivers a full charge in approximately 9.5 hours for both the Zevo 600 and the BrightDrop 400. An optional 19.2 kW charger reduces this to approximately 6 hours. Level 2 is well-suited for fleets that charge overnight between shifts, keeping vehicles ready for the next day without interrupting operations.
Level 3 (DC Fast Charging): Delivers the fastest charging speeds available for BrightDrop electric vans. Both the Zevo 600 and BrightDrop 400 support DC fast charging up to 120 kW, allowing the Zevo 600 to charge from approximately 10% to 80% in about 45 minutes. Note that using DC fast charging over extended periods as a daily routine can contribute to battery degradation over time. It is best used when rapid turnaround is needed rather than as a replacement for regular overnight charging.
BrightDrop Zevo Battery and Range Overview
The BrightDrop Zevo 600 is equipped with a GM Ultium Lithium-Ion Battery with a capacity of approximately 120 kWh (standard configuration), giving it a larger battery suited to full-day commercial routes. The BrightDrop Zevo 400 offers a combined driving range of approximately 264 km (164 miles) on a full charge with the standard battery. Actual range will vary based on traffic conditions, cargo area load, and driving style. Using regenerative braking during stop-and-go city routes can help recharge the battery and extend range throughout the shift. Utilizing cabin preconditioning while the vehicle is still plugged into grid power also conserves battery energy for driving.
Charging Infrastructure for Commercial EV Fleets
For businesses managing a fleet of BrightDrop vans, setting up the right charging infrastructure is an important step in day-to-day operations. Here are key factors to keep in mind:
Electrical requirements. Commercial EV charging typically requires 40A to 80A dedicated circuits per unit. Heavy-duty EV infrastructure draws high current, and using commercial extension cords presents a significant fire hazard. Always consult a qualified electrician before any upgrade to your electrical setup. Factors such as the distance from electrical panels to parking areas, underground conduits, or trenching requirements can significantly affect installation scope.
Installation costs. In Canada, straightforward Level 2 charger installations typically range from $800 to $2,000 per charger where sufficient panel capacity exists. Costs can increase to $2,000 to $6,000 or more if electrical upgrades, load management systems, or multiple-unit installations are required. Proper installation must meet Canadian electrical code standards, including dedicated circuits, proper breaker sizing, and permit approval.
Off-peak charging. Scheduling charging during off-peak hours reduces energy costs. The BrightDrop Zevo charging app's Home Charge Location and schedule settings make it easy for EV owners and fleet drivers to set this up directly from the vehicle. This is one of the most reliable ways to lower the cost of running commercial vehicles over time.
Financial incentives. Businesses electrifying their fleets can take advantage of federal and provincial programs to help offset infrastructure costs. The Zero Emission Vehicle Infrastructure Program (ZEVIP) provides funding for businesses to install EV charging infrastructure. Many provinces also offer rebates for commercial charger installation. Contact your account representative or visit the program websites to find the incentives that apply to your fleet and region.
Disclaimer
This article is based on information sourced from the official user manual/website provided by the product’s manufacturer. We do not claim ownership of the content, technical specifications, or procedures referenced. It is intended solely for informational purposes and should not replace the manufacturer’s official documentation.
For complete product details, operating instructions, and service guidelines, please refer to the manufacturer’s manual.
Please note: 7Gen is not an authorized service center. If you are a 7Gen client, please reach out to us through our support line below. Otherwise, contact the manufacturer or your equipment supplier directly for any support or service needs.
If you're exploring fleet electrification solutions or would like to learn more about partnering with 7Gen, please contact us at contact@7gen.com.
DO YOU HAVE AN ISSUE THAT REQUIRES FURTHER ASSISTANCE?
Please, do not hesitate to contact us through:
- 7Gen Customer Support Portal. By clicking here you can find instructions on how to create an account within our support center.
- Email: support@7gen.com
- Emergency line / 24/7 Call Centre: +1 855 743 6938